Getting Started

Up and running with
CoolerCount

Step-by-step guides for every module — from your first login to printing your first menu.

Recommended Setup Order

1
Administration
2
Inventory
3
Vendors & Orders
4
Menus & Recipes
⚙️

Administration

Configure your restaurant profile, set up your team, and understand access privileges.

Ready
  • Restaurant profile & settings
  • Understanding privilege groups
  • Adding and managing users
  • Bulk-loading your initial inventory
  • Units of measure management
📦

Inventory

Build your item list, set PAR levels, and keep on-hand quantities accurate.

Ready
  • Setting up categories & storage locations
  • Adding inventory items
  • Understanding OUT / LOW / OK status
  • Updating quantities — three ways
  • Bulk importing on-hand counts
🚚

Vendors & Orders

Manage your supplier relationships, build order guides, and run the full purchase order lifecycle.

Ready
  • Adding vendors & building order guides
  • Linking order guide items to inventory
  • Creating purchase orders
  • Sending, receiving & archiving orders
🍽️

Menus & Recipes

Build your ingredient library, author recipes with full nutritional data, and assemble guest-ready menus.

Ready
  • Building the ingredients library
  • AI-powered nutrient auto-fill
  • Authoring recipes with nutrition rollup
  • Assembling menus & printing PDFs

⚙️ Administration

Before anything else, take a few minutes to configure CoolerCount for your operation and set up your team. A solid foundation here makes everything downstream work better.

The Home Screen

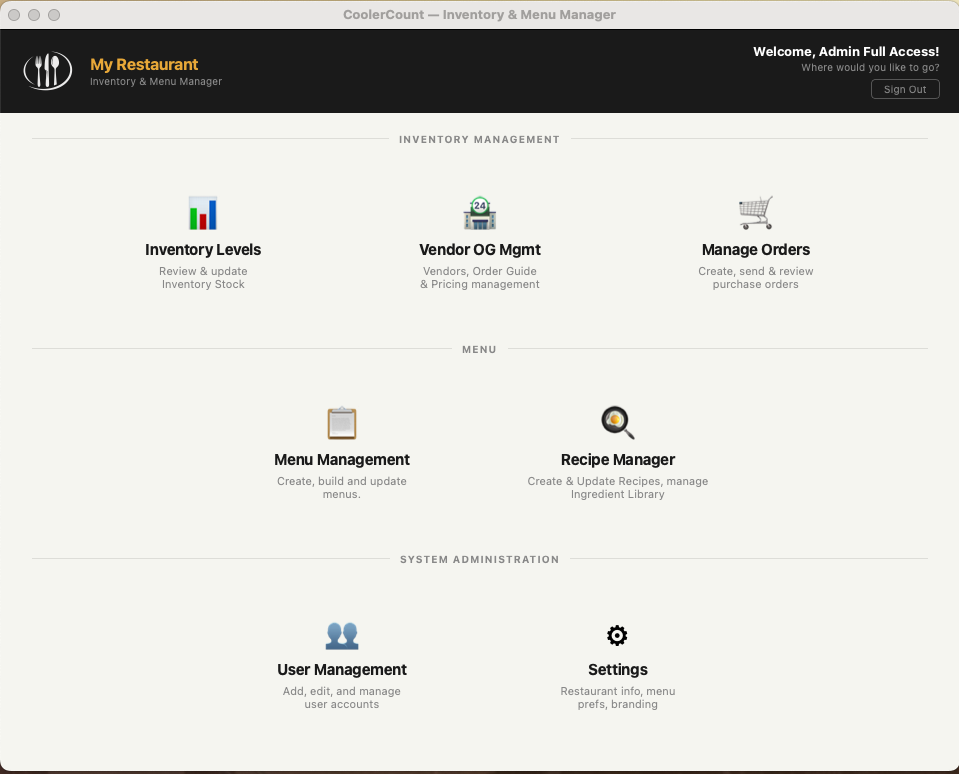
When you log in, CoolerCount lands you on the Home Screen — your central hub for every module. Everything is organized into three groups: Inventory Management, Menu, and System Administration.

Your restaurant name appears in the top-left, your logged-in user and privilege level in the top-right. Use Sign Out when done for the session.
💡Pro Tip: Begin your initial setup in Settings first, then User Management, before opening any other module.
CoolerCount Home Screen

The CoolerCount Home Screen — your central hub

Your Restaurant Profile

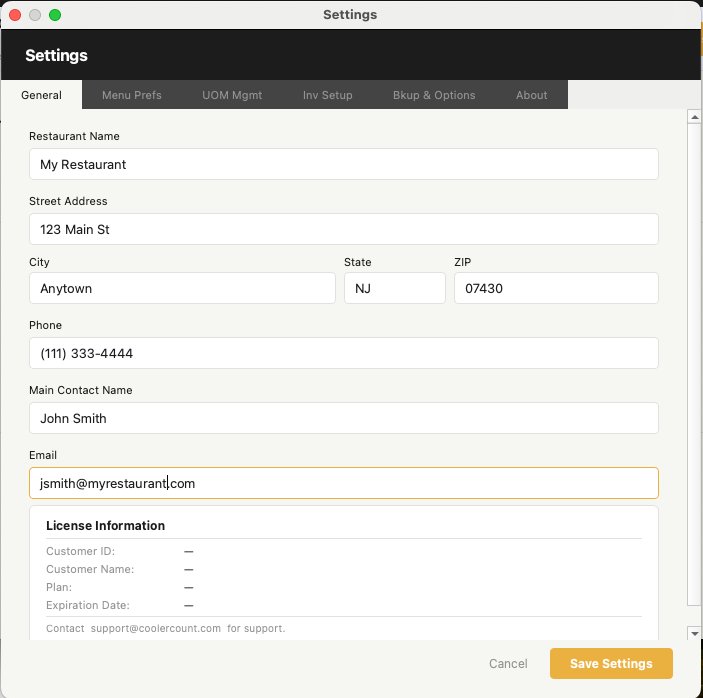
Open Settings from the Home Screen and complete the General tab first. Your restaurant name, address, phone, contact name, and email appear on purchase orders and printed menus.

  1. 1Click Settings on the Home Screen
  2. 2Fill in your restaurant details on the General tab
  3. 3Click Save Settings
📋Settings also includes tabs for Menu Prefs, UOM Mgmt, Inv Import, Backup, and About. Your license information is visible at the bottom of the General tab.
Settings General Tab

Settings → General tab

Understanding Privilege Groups

CoolerCount uses three privilege levels to control what each team member can see and do.

ActionFull AccessManagerView Only
Add & edit inventory items
Delete inventory items
Adjust on-hand quantities
Manage vendors & order guides
Create & send purchase orders
Receive orders
Cancel sent orders
Menu & recipe management
Manage users
💡Limit Full Access to ownership and senior management. Use Manager for kitchen managers and sous chefs. View Only suits staff who need to reference stock levels without making changes.
Privilege Groups

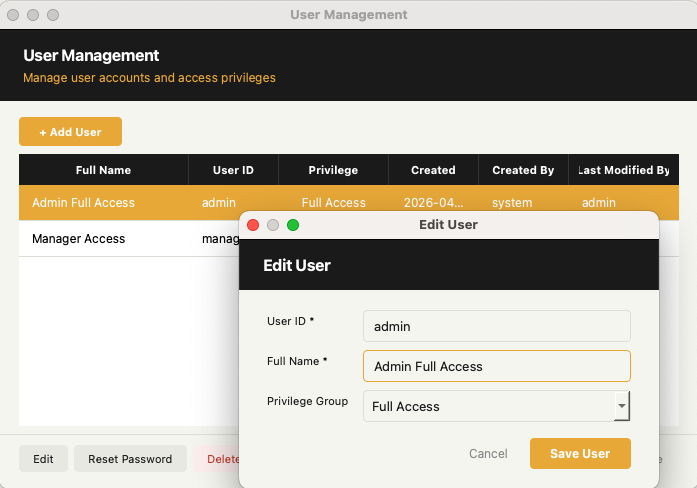
Assigning a privilege group in the Edit User dialog

Adding & Managing Users

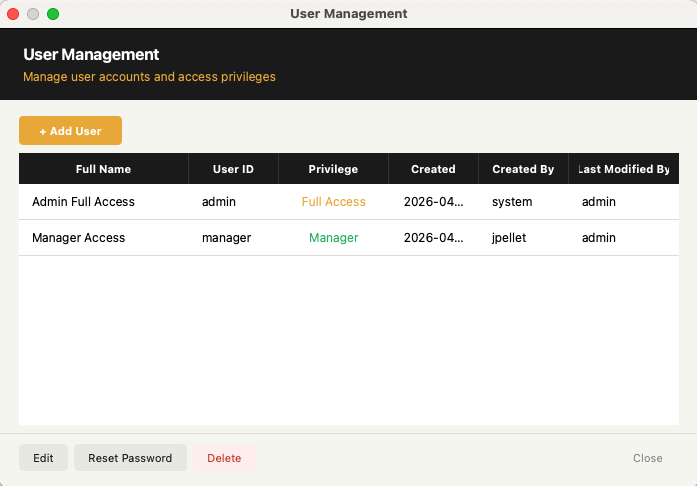
Open User Management from the Home Screen to create login accounts for your team.

  1. 1Click + Add User
  2. 2Enter a User ID, Full Name, and select a Privilege Group
  3. 3Click Save User

New users are prompted to change their password on first login. To reset a password at any time, select the user and click Reset Password.
📋Only users with Full Access can create, edit, or delete user accounts.
User Management

User Management — add and manage your team's access

Bulk-Loading Your Initial Inventory

If you already have your inventory in a spreadsheet, the Inv Import tab in Settings lets you populate your item list in bulk — without entering every item by hand.

  1. 1Open Settings → Inv Import
  2. 2Click Create Import Template to generate a correctly formatted Excel file
  3. 3Fill in your data — or copy from an existing spreadsheet into the correct columns
  4. 4Save the file, return to Inv Import, and click Import Initial Inventory Items
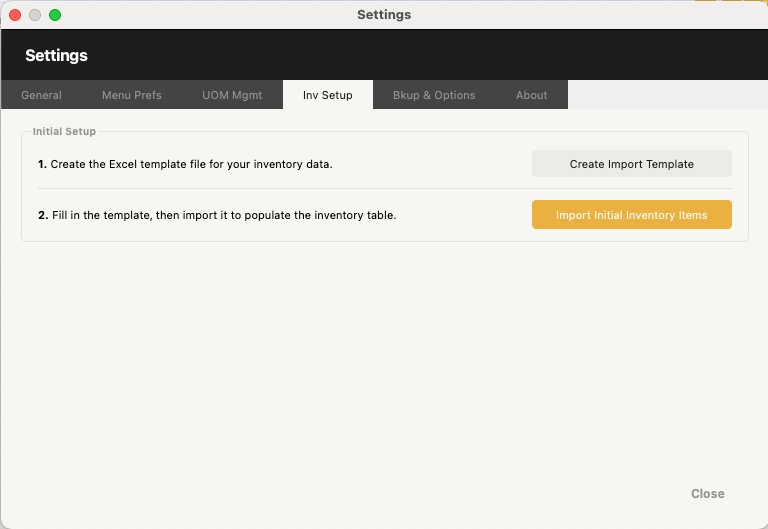
⚠️Format is critical. Always use the CoolerCount-generated template. Do not rename or add columns. Clean data produces a clean inventory list — inaccurate data imports just as faithfully.
💡This is a setup-time tool for initial population. For ongoing On Hand updates, use the Export → Edit → Import On Hand workflow from the Inventory screen.
Settings Utilities tab

Settings → Inv Import — bulk-load your inventory from a template

Units of Measure Management

The UOM Mgmt tab in Settings manages standardized unit codes used across inventory, vendor order guides, and recipes. CoolerCount ships with a comprehensive set covering Count, Volume, and Weight — you can add, edit, or remove units as needed.

The Run UOM Correction button scans your inventory for unit inconsistencies and corrects them automatically against your UOM list — particularly useful after an initial bulk import.
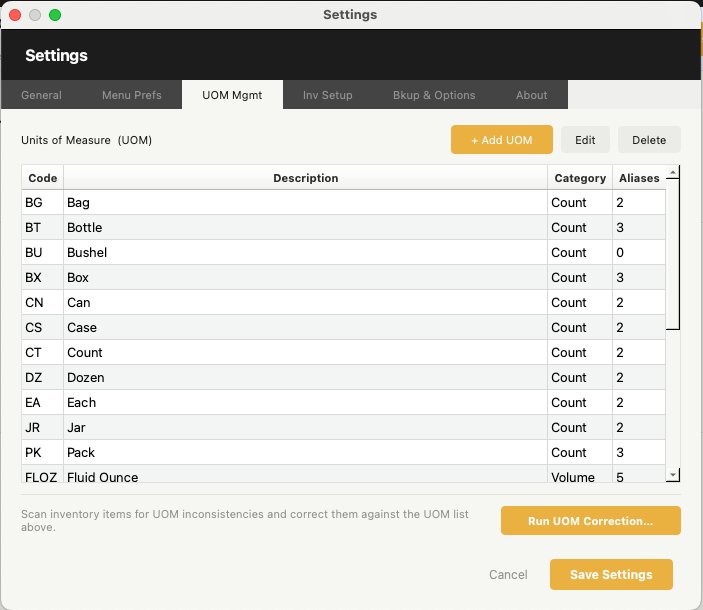
💡Review your UOM list before building vendor order guides. Consistent unit codes between inventory items and vendor items allow CoolerCount to match them correctly during ordering.
UOM Mgmt tab

Settings → UOM Mgmt — manage your units of measure

📦 Inventory

Your inventory item list is the backbone of everything in CoolerCount. A complete, well-organized list drives accurate ordering, precise recipe costing, and reliable stock visibility. Take the time to set it up right — it pays dividends every day.

Setting Up Inventory Categories

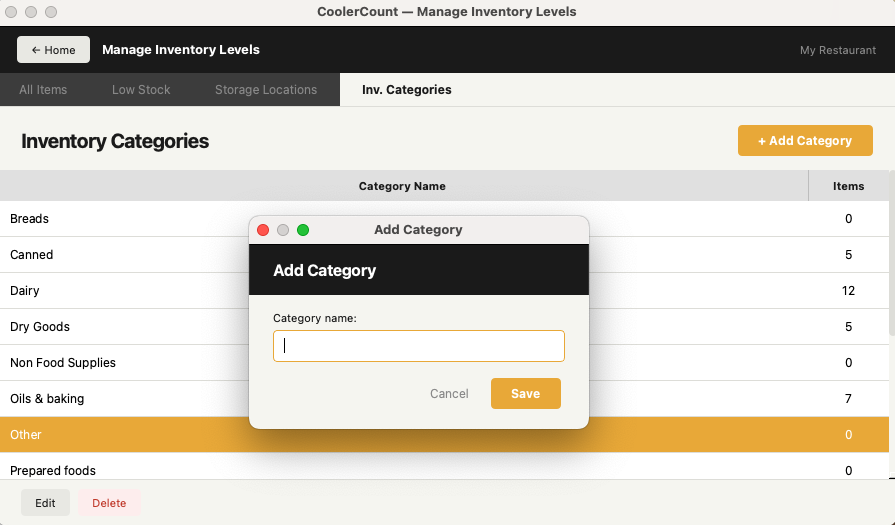
Categories organize your item list and make filtering fast. Set these up before adding items. From Inventory Levels, click the Inv. Categories tab.

  1. 1Click + Add Category
  2. 2Enter a category name (e.g., Proteins, Dairy, Produce, Dry Goods)
  3. 3Click Save — repeat for each category needed

The Items column shows how many inventory items are assigned to each category — helpful for spotting gaps.

💡Mirror the category structure your kitchen already uses. Familiar names speed up counting and ordering.
Inventory Categories

Inv. Categories tab — add and manage your category list

Setting Up Storage Locations

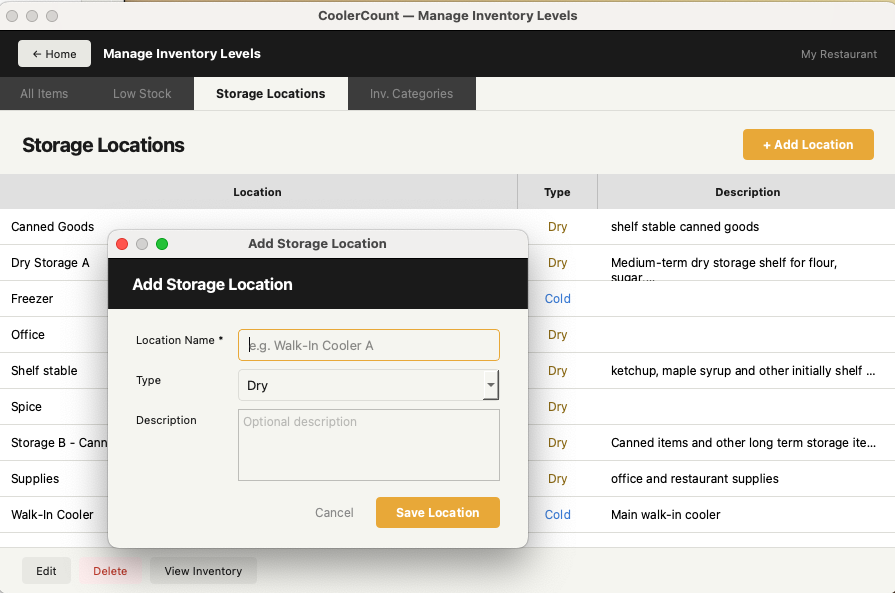
Storage locations tag each item with where it lives — Walk-In Cooler, Dry Storage, Freezer, etc. Click the Storage Locations tab from the Inventory screen.

  1. 1Click + Add Location
  2. 2Enter a Location Name
  3. 3Select the Type: Dry, Cold, or Frozen
  4. 4Add an optional description and click Save Location
💡Use View Inventory from Storage Locations to instantly filter the item list to just that location — great for a focused count.
Storage Locations

Storage Locations — define where items live in your kitchen

Your Inventory List — All Items & Low Stock

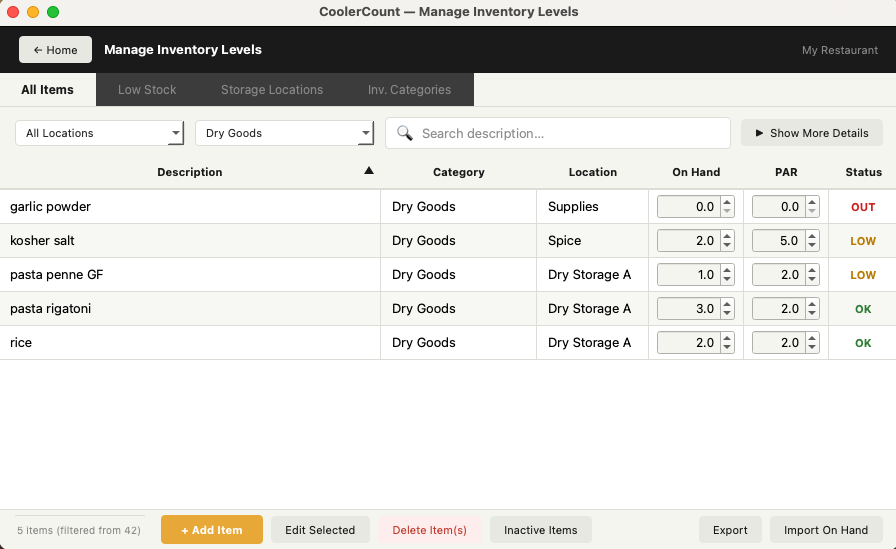
The All Items tab is your primary inventory view. The Low Stock tab shows the same list filtered to LOW and OUT items — your fast daily ordering check. Both tabs behave identically; use the Location and Category dropdowns and Search field to narrow the list.

OUT — on hand is zero LOW — below PAR level OK — at or above PAR
📋Status is calculated automatically — you never set it manually. Keep On Hand and PAR accurate and status takes care of itself.
Inventory All Items

All Items tab — filtered to Dry Goods, showing OUT / LOW / OK status

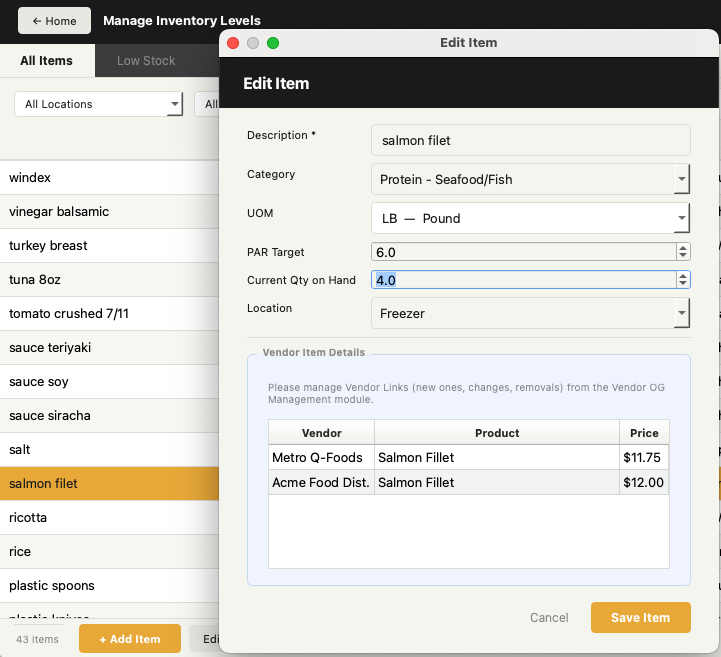
Adding an Inventory Item

Click + Add Item from any inventory tab to open the item form.

  1. 1Enter a clear Description
  2. 2Select a Category and Location
  3. 3Choose a Unit of Measure (UOM)
  4. 4Set a PAR Target — your minimum desired on-hand quantity
  5. 5Enter Current Qty on Hand
  6. 6Vendor Item Details shows the vendors this item is currently linked to
  7. 7Click Save Item
💡The vendor links connect this item to Vendor order guides so CoolerCount can suggest it automatically when stock falls below PAR. You can add or update this link at any time in Vendor OG Mgmt.
Edit Item dialog

The Edit Item dialog — all fields for a single inventory item

Updating On Hand Quantities — Three Paths

CoolerCount gives you three ways to update On Hand quantities, each suited to a different situation.

1

Inline Spinners

Tap the up/down arrows directly in the On Hand or PAR column of the item list. No dialog — changes save immediately.

Best for: quick single-item adjustments
2

Edit Selected

Select an item and click Edit Selected to open the full item form. Update On Hand, PAR, and any other fields in one step.

Best for: updating multiple fields at once
3

Bulk Import

Click Export to download the current item list (full or filtered). Update the On Hand column, then use Import On Hand to apply all changes at once.

Best for: full inventory counts
⚠️Bulk Import rules: The export reflects whatever is currently displayed — filter first if working on a specific section. Blank cells are skipped and leave existing values unchanged. Entering zero sets the quantity to zero. Only On Hand is updated; PAR levels are not affected.

🚚 Vendors & Orders

CoolerCount manages the full purchase order lifecycle — from building your vendor relationships and order guides through to receiving deliveries and archiving completed orders. Once your vendors and order guides are set up, the ordering workflow runs smoothly and fast.

Vendors & Order Guides

Adding Vendors & Building Order Guides

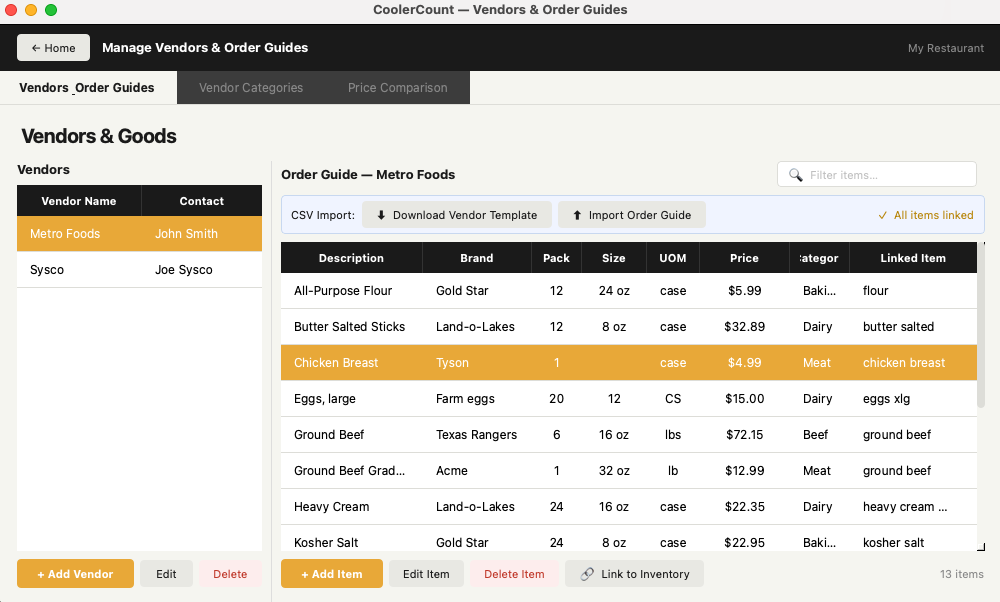
Open Vendor OG Mgmt from the Home Screen. Your vendor list appears on the left; their order guide fills the panel on the right. Click + Add Vendor and enter the vendor's name, contact, phone, and email. That email address is where purchase orders will be sent.

Once a vendor is selected, click + Add Item to build their order guide — description, brand, pack, size, UOM, price, and category for each product.

💡CSV Import: If your vendor provides a product list in CSV or Excel format, use Download Vendor Template and Import Order Guide to load their catalog in bulk — much faster for large order guides.
Vendor Order Guides

Vendor OG Mgmt — vendor list and order guide side by side

Linking Order Guide Items to Inventory

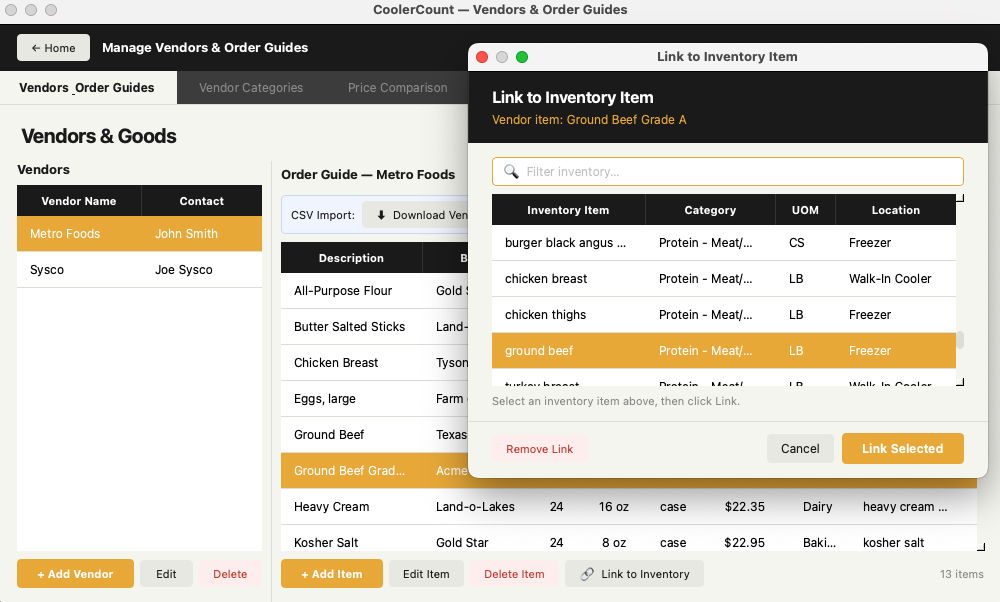
Linking connects your vendor's products to your inventory items — the step that enables automatic order suggestions when stock falls below PAR.

  1. 1Select an item in the order guide
  2. 2Click Link to Inventory at the bottom of the screen
  3. 3Find and select the matching inventory item in the dialog
  4. 4Click Link Selected

The All items linked indicator at the top-right confirms when every item is connected.

📋An inventory item can link to order guide entries from multiple vendors. During ordering, CoolerCount defaults to the lowest-priced vendor for each item.
Link to Inventory Item

Link to Inventory Item — connecting a vendor product to your inventory

Purchase Orders

Creating a Purchase Order — Step 1

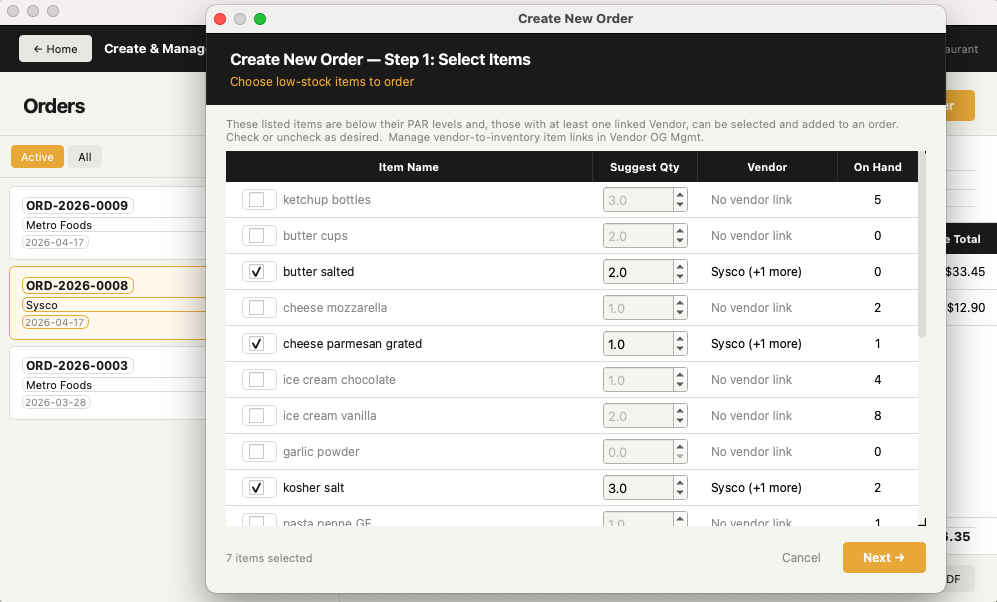
Open Manage Orders and click + Create New Order. Step 1 presents every inventory item that is currently LOW or OUT, with a suggested order quantity and linked vendor.

  1. 1Check the items you want to order, uncheck any you're skipping
  2. 2Adjust suggested quantities as needed
  3. 3Items showing No vendor link can't be ordered until linked in Vendor OG Mgmt
  4. 4Click Next → when your selection is complete
💡Items already on an open order are flagged — helpful for avoiding duplicates when multiple staff are placing orders.
Create New Order Step 1

Step 1 — select items to order and adjust quantities

Creating a Purchase Order — Step 2

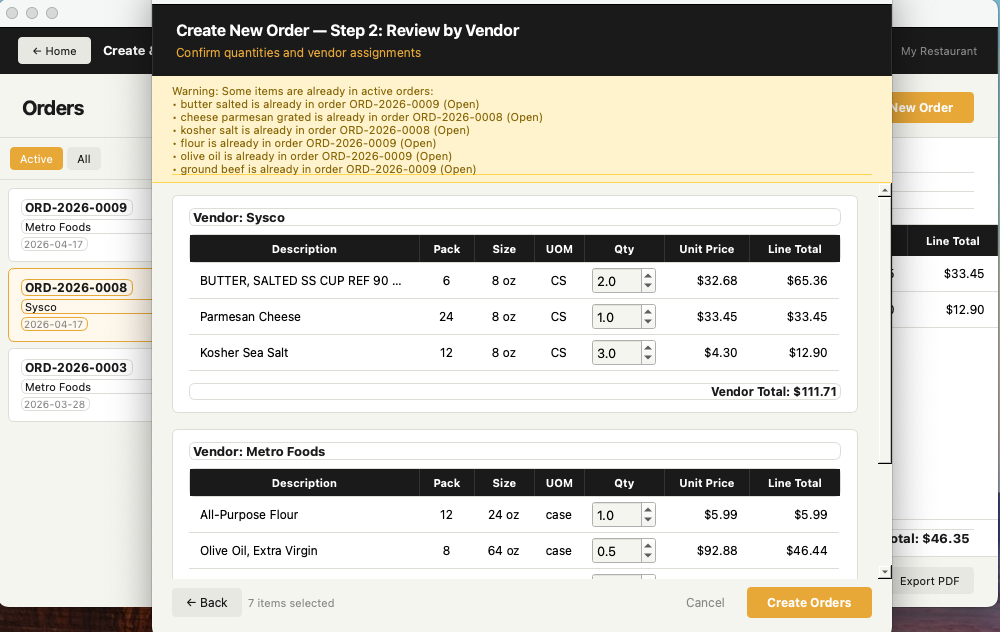
Step 2 groups selected items by vendor with unit prices and line totals. CoolerCount defaults to the lowest-priced vendor for items available from multiple suppliers.

  1. 1Review line items and totals for each vendor group
  2. 2Adjust any quantities using the spinners
  3. 3Click Create Orders — a separate purchase order is generated for each vendor
📋Prices shown here are live from your order guide and will be locked permanently once the order is marked Sent.
Create New Order Step 2

Step 2 — review by vendor, confirm quantities, and create orders

Managing Orders — Status & Actions

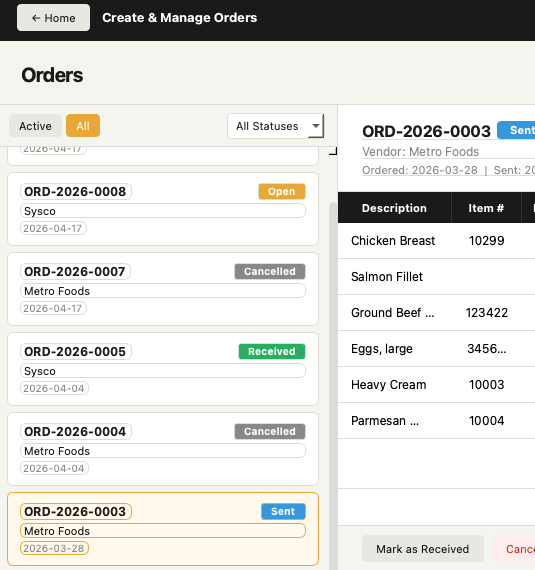
The Orders screen shows active orders on the left and the selected order's detail on the right. Use the Active / All toggle and All Statuses filter to navigate your order history.

Open Sent Received Archived

From an open order: Add Items, Mark as Sent, Email Order to Vendor, Export PDF, or Cancel Order. Once Sent, prices are locked permanently.

💡Email Order to Vendor sends the PO PDF directly to your vendor's order contact from po@coolercount.com, with your restaurant's email as reply-to.
📧Pro tip for new users: While you're getting comfortable with vendor orders, consider setting each vendor's email address to your own email (not the vendor's actual address). When you build and email purchase orders, they'll come to you first — you can review each one before forwarding it to the vendor. Once you're confident, switch the vendor email back to their real address; orders will then go directly to them, with a copy to you for your records.
Orders list all statuses

Orders list — Active/All toggle and status filter show your full order history

Receiving an Order

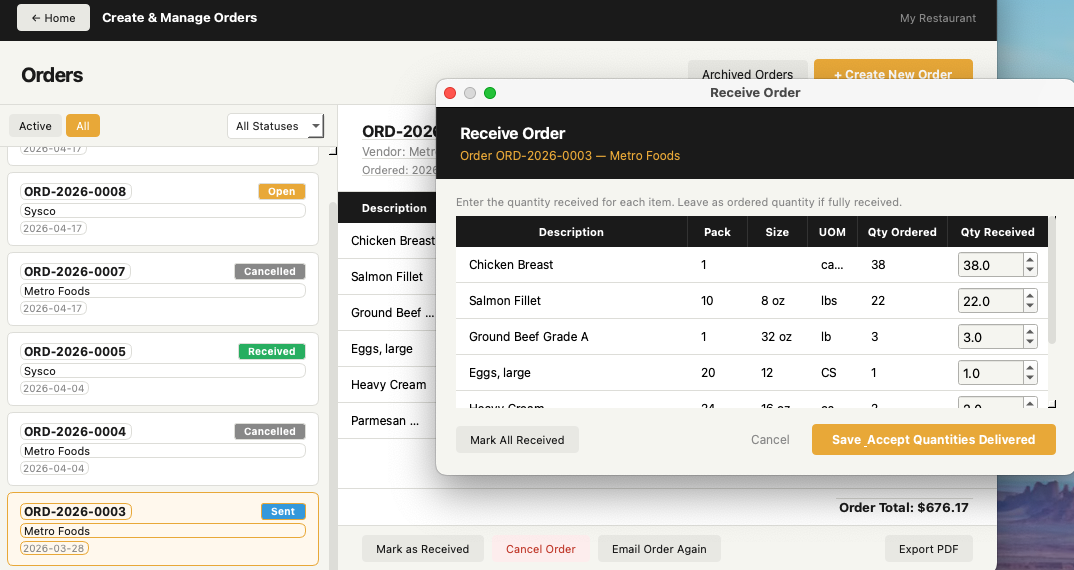
When a delivery arrives, select the Sent order and click Mark as Received.

  1. 1Select the Sent order in the list
  2. 2Click Mark as Received
  3. 3Enter the quantity received for each line — or click Mark All Received if the delivery was complete
  4. 4Click Save & Accept Quantities Delivered
📋If a delivery is short or an item is substituted, enter the actual quantity received to keep your records accurate for reconciliation and future ordering.
Receive Order dialog

Receive Order — enter actual quantities delivered for each line item

🍽️ Menus & Recipes

CoolerCount's Menu and Recipe modules work together to give you guest-ready menus backed by accurate nutritional data. Build your ingredients library first, author recipes from those ingredients, then assemble your menus and print. Each step builds on the last.

Ingredients Library

The Ingredients Library

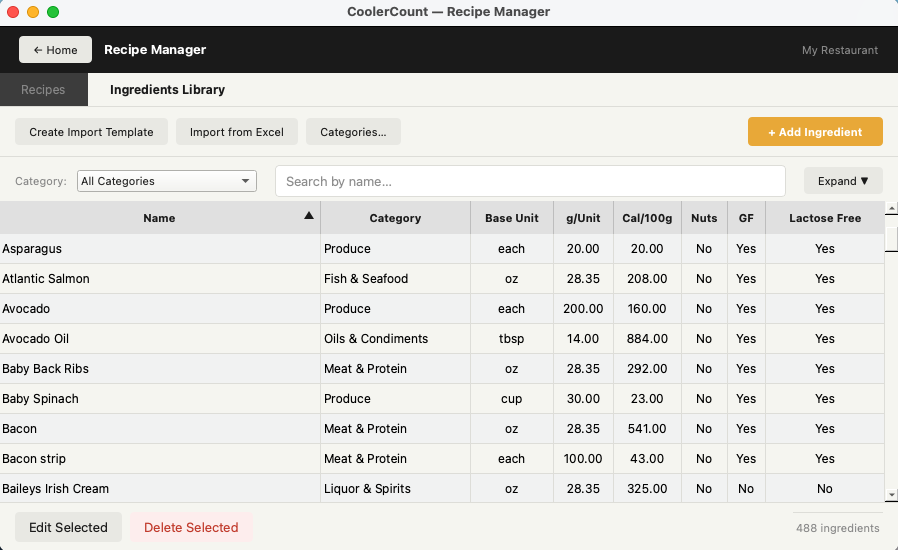
Open Recipe Manager and click the Ingredients Library tab. This is your master list of culinary ingredients — the nutritional building blocks for every recipe you create. Each ingredient stores its base unit, a grams-per-unit conversion, and per-100g nutritional values. Allergen flags roll up automatically to any recipe the ingredient appears in.

📋Ingredients Library vs. Inventory: The Ingredients Library holds nutritional data for recipe-building. The Inventory list tracks operational stock for ordering. An item like "chicken breast" may appear in both.
💡CoolerCount ships with nearly 500 pre-loaded ingredients. Check the library before adding — your ingredient may already be there.
Ingredients Library

Ingredients Library — 488 pre-loaded ingredients with full nutritional data

Adding an Ingredient

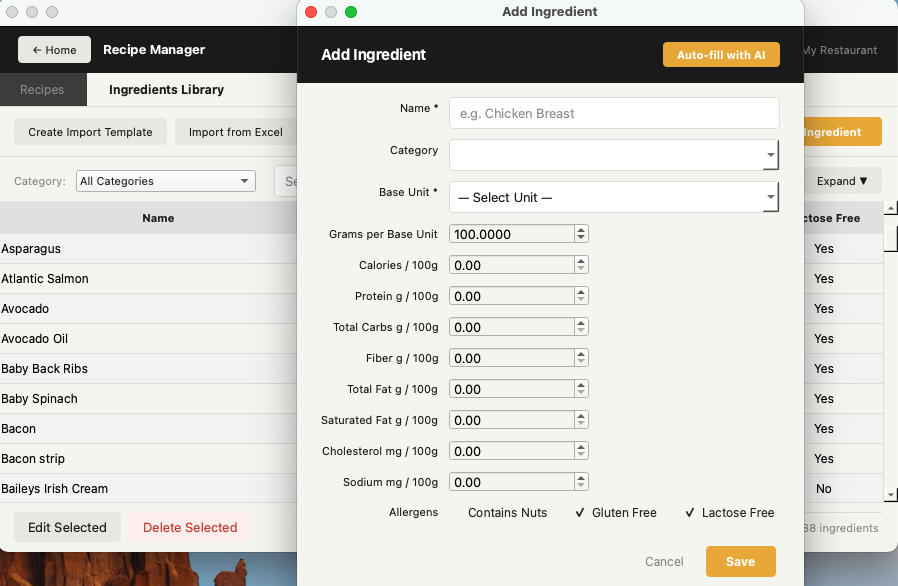
Click + Add Ingredient. The key fields are Base Unit and Grams per Base Unit — the conversion bridge that lets CoolerCount calculate accurate recipe nutrition regardless of measurement unit.

  1. 1Enter the ingredient Name and select a Category
  2. 2Select the Base Unit you measure this ingredient in
  3. 3Confirm or adjust the Grams per Base Unit conversion
  4. 4Click Auto-fill with AI to populate all nutritional values automatically
  5. 5Review values, set allergen flags, and click Save
Auto-fill with AI: Enter the ingredient name and click this button before filling in any nutritional fields. CoolerCount populates calories, protein, carbs, fat, fiber, cholesterol, and sodium automatically — a significant time-saver.
Add Ingredient dialog

Add Ingredient — Auto-fill with AI populates nutritional data automatically

Recipes

Building a Recipe

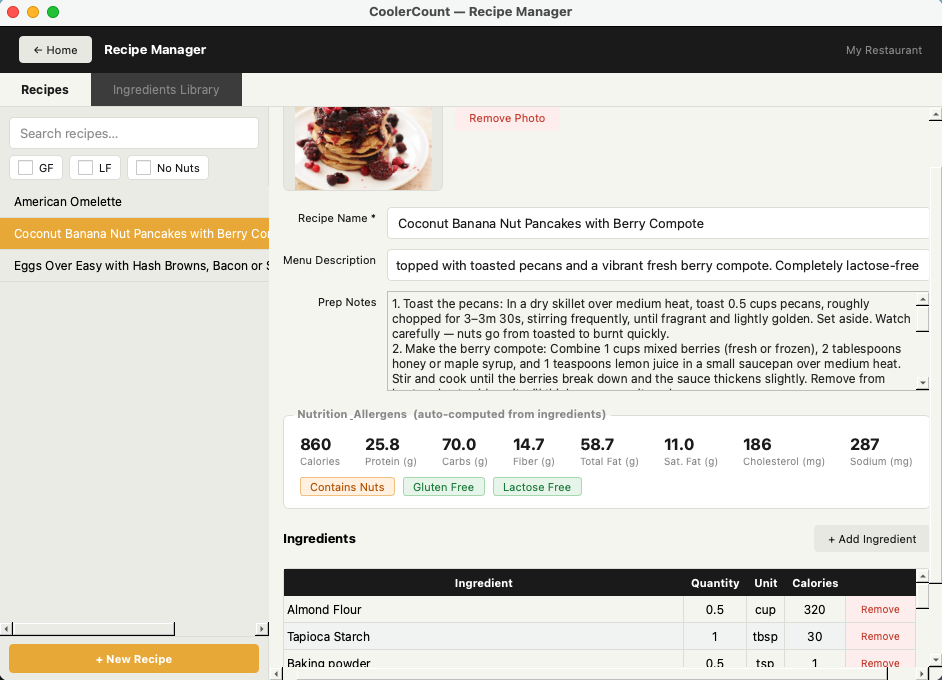
Click the Recipes tab, then + New Recipe. Enter a name, menu description (the guest-facing text for printed menus), and preparation notes. Once saved, click + Add Ingredient to build the ingredient list — CoolerCount computes aggregate nutritional totals and rolls up allergen flags automatically as each ingredient is added.

You can attach a recipe photo, which can optionally appear on printed menus.

💡Nutrition is automatic: Recipe totals update instantly every time you add or remove an ingredient — no manual calculation needed.
📋Allergen flags are set automatically based on ingredients. If any ingredient contains nuts, the recipe is flagged accordingly.
Recipe Manager

Recipe Manager — auto-computed nutrition and allergen summary from ingredients

Menus

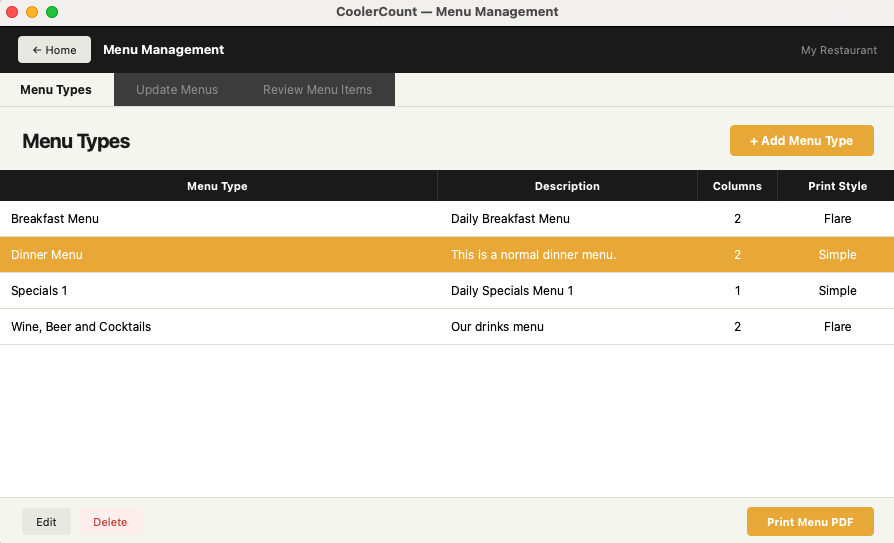
Creating a Menu Type

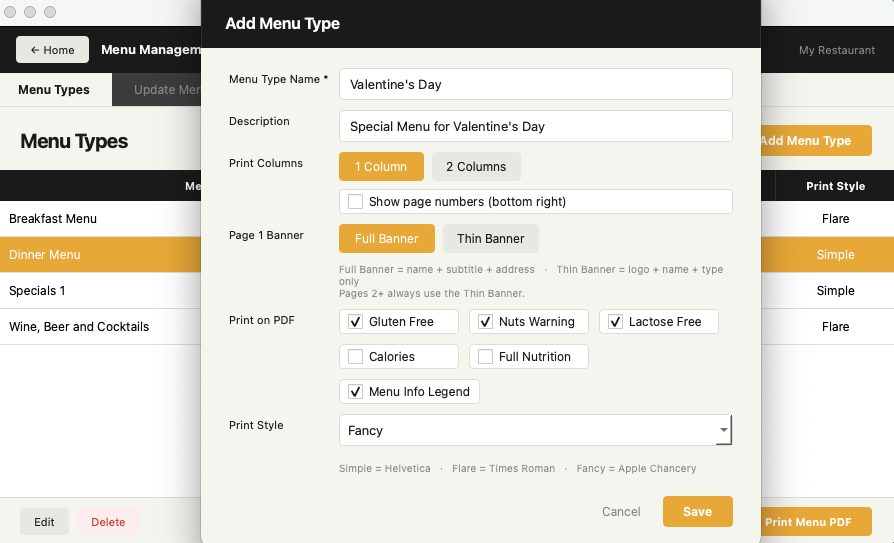
Open Menu Management from the Home Screen. The Menu Types tab lists all your menus — Dinner, Breakfast, Cocktails, Daily Specials, and so on. Click + Add Menu Type and configure the print options that apply to the entire menu:

  • Print Columns — 1 or 2 columns per page
  • Page 1 Banner — Full (name, subtitle, address) or Thin (logo, name, type)
  • Print on PDF — Gluten Free, Nuts Warning, Lactose Free, Calories, Full Nutrition, Menu Info Legend
  • Print Style — Simple (Helvetica), Flare (Times Roman), or Fancy (Apple Chancery)
Add Menu Type dialog

Add Menu Type — set layout, print options, and style for the entire menu

Building Your Menu — Sections & Items

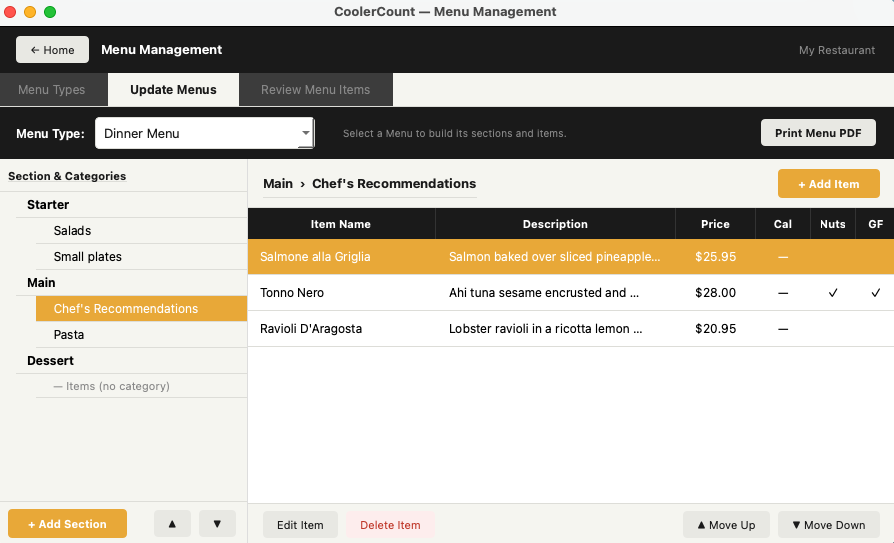
Click the Update Menus tab and select your menu. CoolerCount uses a three-level structure: Section → Subsection → Items (e.g., Main → Chef's Recommendations → Salmone alla Griglia). Click + Add Section to create top-level sections, then add items within each subsection.

  1. 1Enter the Item Name and Menu Description
  2. 2Set the Price — or a comment like "MP" for market price
  3. 3Optionally link a Recipe — this pulls description, calories, and dietary flags automatically from the recipe
  4. 4Use Move Up / Move Down to arrange items within a subsection
💡When a recipe is linked, name, description, calories, and allergen flags are pre-filled from the recipe and kept in sync automatically.
Menu Sections and Items

Update Menus — section tree on the left, items on the right

Printing a Menu PDF

CoolerCount generates a print-ready PDF for any menu type at any time. From either the Menu Types tab or the Update Menus tab, click Print Menu PDF. The PDF reflects the print settings configured when you created the menu type.

💡Each menu type prints independently — maintain a Dinner Menu, Breakfast Menu, Daily Specials, and Cocktail Menu simultaneously, each with its own layout and style.
📋The Review Menu Items tab gives you a flat, searchable list of every item across all menus — useful for a quick audit of descriptions, prices, and dietary flags before printing.
Menu Types tab

Menu Types — manage all your menus and print PDFs from here